Pages

Friday, October 28, 2011

Suzuki Savage low budget chopper build


O.K. check this out. This is one of my favorite builds that a friend of mine over at BOB's CHOP SHOP started doing and I had to try one. I bought a broken down Suzuki Savage and built this beauty with the help of some of the students I used to teach at Wyofuck motorcycle tech school here in Fl. Simple build, but some things had to be done electrically as this thing is a huge single 650cc thumper. This means it has an electric decompression system on it. Be careful to not F#@$ it up! These pictures were actually taken before it was done. I see it is missing pipe wrap in these pictures, but you get the idea. Yes Ducatis and Triumphs in the back ground. This was done when I was assisting the great Chip Ream in the European class.  


Hard to tell, but the rear struts were nice aluminum bars. The seat was made from garment leather with a wooden pan under it. Two skills you will learn at KNIGHT SCHOOL.  Handle bars were a custom set built by SUICYCLE MFG. They had a half throttle tube on them so you can grip the throttle tube and the bar at the same time to keep the throttle from jumping when you hit bumps in the road. Cool option for a low budget build. Little tail light on the back of the seat. I sold this to a local guy as his first bike. I think he still rides it to work every day. You may know this bike as an S40 boulevard. Really nice chopper for under $3,000! 


Tuesday, October 18, 2011

1968 Honda Benly


This is a freshly painted 1968 Honda Benly. Commonly called a mini dream. It of course is not a dream, but a Benly. 160cc twin engine powers this little bike to an amazing 65 mph. At least it did before I took it apart! Some very cool things about the design of this little bike attract me to them. Uni-body construction reminds me of some European bikes and scooters I do. The rear sprocket stays on the swing arm when the wheel is removed. Thats cool. I love the front fender with the "Darth Vader" splash guard. The leading link suspension in the front is cool too. O.K. so the bad things now. "You meet the nicest people on a Honda". Who cares how nice the guy is? He's riding a Honda. The uni-body is cool, but a bitch to restore. It is more like working on a car than a bike. Difficult to do correctly, many places hard to sand. I was lucky, this one had no rust holes. Imagine if it had the bottom six inches rusted off! 


Her are the rest of the parts, minus the chrome stuff. Not back yet. Chroming is the one thing we here at KNIGHT SCHOOL do not do in house. For those of you that do not know why, it has to do with toxic chemicals and federal regulations. Send it out. Notice the color differences in the paint and the original plastic covers on the right. We are still debating on painting them, polishing them or replacing them. The original badges are sitting on the red box. Very nice condition for as old as they are. 


Here is a standard photo of the parts needing chrome. Take this photo and send it with the parts for reference so the chrome guy can know he has all of your parts. Keep a copy for your records, so you know you have gotten all of it back! Can you identify all these parts? 


More as we progress. 

Monday, October 17, 2011

NSU CUSTOM BUILD

This is a full on build from the ground up. All aluminum frame from scratch. Front fork from scratch. Modified wheels and hubs. Engine mounts, seat, gas tank, controls and so on all built from scratch. NO bolt on magic like the TV guys! Even the engine is a 1937 that had to be rebuilt. Guess where... you got it right here at KNIGHT SCHOOL.  The small 98cc two stroke engine produces just this side of no power, but is cool and looks good and will haul this little bike around at about 45MPH. 


The fork is a hand built girder out of a .75 inch thick bar of aluminum. Fully machined in the KNIGHT SCHOOL machine room with NO plans. We used a method of machining both sides at once so they would fit each other, but it does not require a set plan. More of an artistic approach. OLD SCHOOL for sure. It is becoming a lost art. Here at the school we do most everything by hand. It teaches the art at a fundamental level. After that understanding has been reached the students can make the leap to modern methods and machines more easily then going the other direction. Check out the raised squares for strength and looks. The neck bearings are from a mountain bike company that specializes in really durable parts. Plenty of strength for this project.


Check out the rotor on this little hub. I had to machine the hub a bit to accept it, but there it is. The wheel is originally off of a Suzuki 80cc dirt bike. The tires are old Pirellis I had lying around from a simplex or something. The fork has a good two inches of travel in it. When a larger one is built for a full size bike, it will increase to about four inches. 


This is the beginnings of a gas tank. Its design is good, but may not make the final cut. We may go with a more rounded design as this one has a sixties square look to it. 


This is the lower section of the frame. We put the rear wheel stay tubes through the cross brace and will eventually weld them to the brace, but not until everything fits well. The arrow points to the foot peg "notch" that has not been cut yet. The two outside tubes will be bent in to meet the center tube and welded in place to make a nice "arrowhead" shape under the engine. This will also increase strength of the frame. The top of the engine can be seen in the lower left.


Here is the engine. I took this from a parts bike I had that was a 1937. Note the intake port on the side of the cylinder. Typical early two stroke design. 


Below is the right side wheel mount complete with recessed channel for the nut. This makes a clean look. These parts were made from a 1.0 inch plate aluminum. Note I have not put a rear brake on it yet. I am building small cable pull calipers to match the small rotors. I think both brakes are going to be fixed to one lever on the bars eliminating the foot pedal for the back break. A nice clean look and plenty of stopping power for a bike that will not weigh more than 100lbs. 


These are the internal, reverse levers we made for the NSU. The lever itself is a 90 degree angle that pulls a cable out toward the end of the handlebars from the inside when pulled in. These are a cool part for any bike and as is with the fork, we are testing them on the small bike to prove the concept and then we will make full size parts for a large bike.  


Check out the "clubman" style bars. Yes they are mounted that way to lower the grip height helping the rider to lower his front reducing wind resistance! You think your LS 650 needs less wind resistance, what about the venerable 98 NSU Quick motor? 


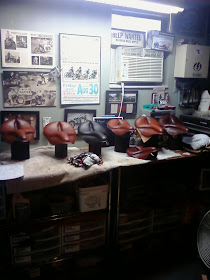
We are thinking of using an Indian racer seat from the teens on this project. Here is a rare photo of a lot of them built in the famous SADDLE SHOP in Edgewater Fl. If you look at the fourth one to the right you will notice it is slightly smaller than the others. The larger ones are Mesinger racers and the smaller is the Indian racer. Wooden seat pans, built at KNIGHT SCHOOL for the Saddle shop. Covered in leather  and shipped all over the world to collectors of fine motorcycles everywhere. Email me for contact information on the Saddle shop. 


More as we progress! 


Tuesday, October 11, 2011

"Snap tight" chopper I mean Custom chopper

Check out this chopper we built. All purchased parts, but went together with some difficulty. 


 Fairly large ULTIMA motor in it. Note the horn on the carb. I must say it went like hell down the road.


Monday, October 10, 2011

K75 BMW rat bike cafe


This is an old K75 I built into a cool every day bike. Sorry about the pictures, not the best but I sold it not knowing I had not gotten the side shots I wanted. As you can see the tank was polished out. Love aluminum! The bars were changed to almost strait with no rise and the frame was shortened a foot to make a single seat ride out of it. The seat of course had to be shortened as well. All the plastic except the belly fairing was removed. Head light was replaced with one from a Ducati monster.  

Very difficult to see is the short muffler we built for it. It was shortened to show off the single side swing arm. The unfortunate byproduct was it was as loud as hell. Not my thing. 

Note the sheet aluminum fender. 

See the bungie ball hanging off the bar along the fork tube. Drink holder, no shit , you figure it out.


Bike was loads of fun to ride and got tons of attention from people trying to figure out what it was. When the BMW guys would ride up and realize it was a BMW they were visibly disturbed...  Loads of fun. The build cost me $200. Oh yeah...
I will do another some day. 

BMW R100 Airhead cafe racer


Here is a bike we built when I was an instructor at Wyotech in Daytona. Please note the student photos. I coached, they built. Until Wyotech destroyed the bike. 
                                                    But don't worry, happy ending. Love happy endings!

 Will this poor engine ever be the same...
                                 Never fear I checked every part before it was assembled.

                             A girl and a red shirt doing frame work?
What the hell is a red shirt? If you attend Wyotech and get good grades they give you a red shirt. They call it an "eagle tech".  Meant to give you something to shoot for but just pissed everyone off because it was academic not hand skill based.

This was written on the bathroom stall wall at school almost every day. 

Here is the crew that built the original bike. Original you ask? Yes. Original implying there is a copy...

Copy it is! All the way down to finding an actual R100. I of course owned many of the parts from the original bike so there are some things that came directly off of the first one. The seat, carbs, triple tree and so on.

Here is a view of the tank strap that holds the tank in place, very thirties racer. The seat is glove leather over closed cell pad with a wood base bolted to an aluminum pan that has been hand shaped out of one piece of sheet. I am happy to send you a copy of the design of the pan so you too can make one. Just hit my email with a request. Make sure you know what the hell you are asking for. No time for B.S.
                                    
 Note the single sided swing arm. 1980 saw the first single sides for BMW on their GS models. I tracked one down, but the wheel proved all but impossible to find. One left in Berlin for a mere $1000! Not gonna pay it so I am building a hub to fit the rear end.
                                                                              

A nice picture of the rear end. The first ones were three bolt hubs. I would not pay for one so the picture below shows the beginning of my solution.


I took a  drum from an earlier bike, actually an R90 I bought came with an extra wheel... Nice. The top picture is the inside of the drum. The bottom picture is of the welds on the outside. I chopped a hole in it and welded in a slug and now I will true it up and drill the three holes in it. Respoke it and there we have it a 1979 single side spoked wheel BMW R100 bad ass cafe bike. Did I mention the engine work? Did you see the deep oil pan?